Using RFQuiltLayout with RubyMotion and RMQ
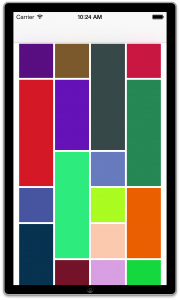
RFQuiltLayout extends UICollectionViewLayout to squeeze
multiple different size boxes onto the screen. It’s the equivalent of
Masonry for iOS collection view cells.
The RFQuiltLayout example uses Interface Builder for most of the setup, which was a challenge to map into code. I’m going to show you everything needed to change the default collection view layout for RubyMotion and RMQ.
TL;DR; here’s how to use RFQuiltLayout. The key is assigning the layout’s delegate.
You can view the project source code on GitHub.
https://github.com/BaylorRae/rubymotion-rfquiltlayout-demo
class ImagesController < UICollectionViewController
  #...

  def self.new(args = {})
    # use RFQuiltLayout for collection view
    layout = RFQuiltLayout.alloc.init
    self.alloc.initWithCollectionViewLayout(layout)
  end

  def viewDidLoad
    #...
    # set the layout's delegate
    layout = collectionView.collectionViewLayout
    layout.delegate = self
    layout.blockPixels = CGSizeMake(75, 75)
  end

  # RFQuiltLayoutDelegate methods
  def blockSizeForItemAtIndexPath(index_path)
    CGSizeMake(1, 2)
  end

  def insetsForItemAtIndexPath(index_path)
    UIEdgeInsetsMake(2, 2, 2, 2)
  end

  #...
end
Step 1: Create an RMQ project
If you already have a project you can skip this step. We are going to create the RMQ project and add our collection view controller.
rmq create demo
rmq create collection_view_controller images
Step 2: Adding RFQuiltLayout to your project
The next step is simple, install RFQuiltLayout. RFQuiltLayout can be installed as a cocoapod, which is Bundler for iOS/OSX.
In your Gemfile add/uncomment the motion-cocoapods gem.
gem 'motion-cocoapods'
Now in your Rakefile add the pod to your build. You can find the latest version from Cocoa Controls (RFQuiltLayout)
app.pods do
  pod 'RFQuiltLayout', '~> 1.1.1'
end
Now that you have the CocoaPod added to your project you need to run two commands.
pod setup
rake pod:install
Step 3: Remove the RMQ frame styles
RFQuiltLayout positions and sets the size of each cell. As a result you don’t need the default code provided by RMQ.
 module ImagesControllerStylesheet
   def collection_view(st)
-    st.view.contentInset = [@margin, @margin, @margin, @margin]
     st.background_color = color.white
-
-    st.view.collectionViewLayout.tap do |cl|
-      cl.itemSize = [cell_size[:w], cell_size[:h]]
-      #cl.scrollDirection = UICollectionViewScrollDirectionHorizontal
-      #cl.headerReferenceSize = [cell_size[:w], cell_size[:h]]
-      cl.minimumInteritemSpacing = @margin
-      cl.minimumLineSpacing = @margin
-      #cl.sectionInset = [0,0,0,0]
-    end
   end
 module ImagesCellStylesheet
-  def cell_size
-    {w: 96, h: 96}
-  end
-
   def images_cell(st)
-    st.frame = cell_size
   end
Step 4: Add the RFQuiltLayoutDelegate methods
At this point RFQuiltLayout is in place. The last step is adding the boxes for
our demo. The boxes method creates 200 items with a random height to showcase
RFQuiltLayout’s awesomeness.
def collectionView(view, numberOfItemsInSection: section)
  boxes.length
end

def boxes
  @boxes ||= 200.times.map do |n|
    {
      height: [1,2,3].sample,
      label: n
    }
  end
end

#...

# RFQuiltLayoutDelegate methods

def blockSizeForItemAtIndexPath(index_path)
  box = boxes[index_path.row]
  CGSizeMake(1, box[:height])
end

def insetsForItemAtIndexPath(index_path)
  UIEdgeInsetsMake(2, 2, 2, 2)
end
Congratulations! You have added RFQuiltLayout to your UICollectionView.
View the project source code on GitHub.
https://github.com/BaylorRae/rubymotion-rfquiltlayout-demo